These 4 Quick Steps Will Ensure You Always Achieve Perfect Grill Marks
It's easy to accomplish. Here's how.
There's no better way to celebrate, well, anything than spending a day grilling large chunks of meat. That's why I've been taking a little bit more time at the grill getting perfect grill marks. This is not difficult a task, but there are a few pointers that can help get the job done right every time.
Grill Grate Selection
To be quite honest, I almost never put any emphasis on grill marks. First, they don't have much effect on taste, and second, the supplied steel grate that comes with most charcoal kettles just doesn't get the job done very well. If you have a gas grill or ceramic cooker, you're probably good to go, but for us kettle owners, it's nice to have a replacement like heavy duty cast iron grates or the aluminum raised raised rail Grill Grates. Both will run hotter than the regular grate and retain heat longer, helpful in getting that deep sear.
Fire Building
"the extreme heat of the grate will certainly leave a mark on the food, and it'll happen fast—in about one to two minutes"
The perfect grates will be of no use without the right fire. To achieve the right balance between aesthetic and proper cooking, I use the two-zone indirect arrangement of the coals with the highest heat possible. This means jumping into action as soon as the coals are fully lit and letting the grill get super heated by leaving it covered for five to ten minutes before cooking. At this point, the extreme heat of the grate will certainly leave a mark on the food, and it'll happen fast—in about one to two minutes—most likely faster than the food can fully cook, which is why the two-zone fire is so important. Once the marks are firmly imprinted, you'll want to preserve that masterpiece by moving the food to the cooler side of the grill, cover, and continue the cook until it's done to your liking.
Food Prep
With a super heated grill and a quick sear, there's bound to be some food sticking issues, which could cause ruin to any grill marking efforts. To avoid this, it's important that either the grilling grate or the food has a nice coating of oil. Even well-oiled food may have a little stick when first put down on the grill, but with the right lubrication, the food should release from grate after the marks are nicely branded in.
Food Placement
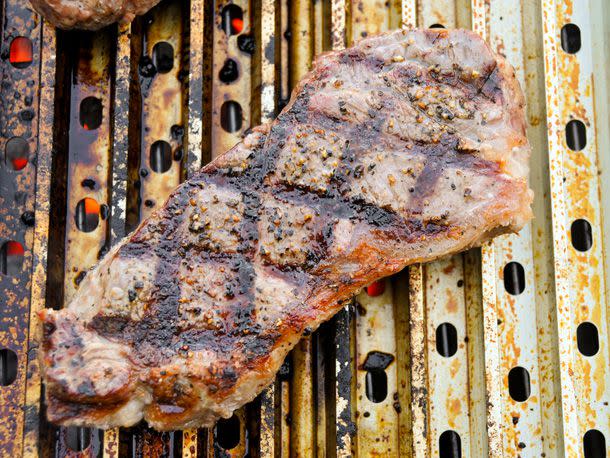
Even though grill marks aren't adding a whole lot in the flavor department, I know that we eat with our eyes first, and they're definitely evocative in that respect. So if I'm spending the time marking up the meat, I want it done as pretty as possible, and food placement is key.
There's two commonplace patterns to grill marking: the single strip and the crosshatch. Either one you choose, the food should start out at a 45 degree angle to the grate, so the marks will be angled on the finished product. For the single strip of marks, simply use this placement on both sides, but if you're grilling to impress, you'll want to go crosshatch. To achieve the crosshatch, get the first sear done at 45 degrees, then rotate 90 degrees and sear again, flip and repeat. This leaves a diamond grid that will let everyone know that you're a true grill master.
Read the original article on Serious Eats.
